

🎥 Introduction:
Welcome to our channel! In today's Article, we're thrilled to share with you an incredible tool that will revolutionize your online experience. We'll show you how to download, install, and configure STARK VPN RELOADED, a top-rated VPN app available on the Play Store. With STARK VPN RELOADED, you can enjoy a secure and fast internet connection while bypassing restrictions and protecting your privacy.
🚀 Step 1: Download and Install
To begin, head over to the Play Store and search for "STARK VPN RELOADED." Once you find the app, simply tap on "Install" to start the download process. Once installed, you're ready to take control of your internet freedom.

📲 Step 2: Launch the App
Now, it's time to launch STARK VPN RELOADED. As the app opens, you'll be greeted by its user-friendly home interface, designed to provide you with easy access to its powerful features.

⚙️ Step 3: Access Settings
To customize your VPN experience, click on the gear icon located within the app's interface. This will open up a menu where you can fine-tune various settings according to your preferences.

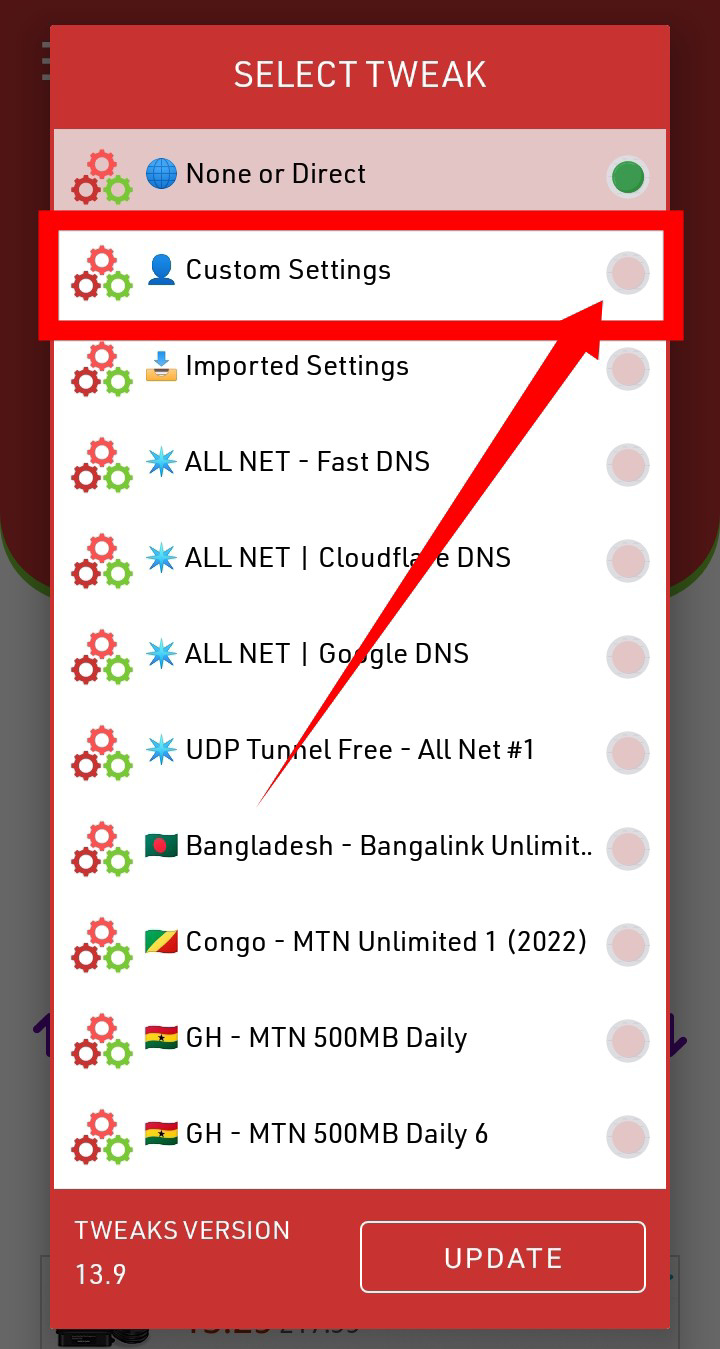
🔧 Step 4: Select Custom Settings
Within the settings menu, you'll find an option called "Custom Settings." Click on it to enter the realm of personalized configuration, where you can optimize your VPN setup.
🛠️ Step 5: Edit Settings
Once you're in the "Custom Settings" section, look for the hamburger icon and give it a tap. This will reveal additional options that allow you to tailor your VPN configuration.

🔒 Step 6: Choose Your Protocol
Within the options, you'll discover TCP, HTTP, and SSL protocols. Select the protocol that aligns with your specific requirements. We'll guide you through each one:
i. TCP Protocol: This protocol requires a working payload with a valid proxy or bug host. Enter the necessary information in the designated fields, including the port number (e.g., 80 or any other functioning port).

ii. HTTP Protocol: In this section, input a working proxy or bug host, along with the corresponding port number (e.g., 80 or any other preferred port).

iii. SSL Protocol: For SSL, enter a working SNI (Server Name Indication) host and the appropriate port number (e.g., 443 or any other suitable port) in the provided fields.

💾 Step 7: Save and Apply Changes
After configuring your preferred protocol, save the settings, and return to the app's home interface. Your personalized VPN setup is now ready for action.

🔗 Step 8: Connect and Enjoy!
It's time to experience the power of STARK VPN RELOADED. Click on the "Connect" label button, and witness the app establish a secure and reliable VPN connection. Sit back, relax, and enjoy seamless browsing with enhanced privacy and freedom.

🎉 Conclusion:
Congratulations on successfully setting up and utilizing STARK VPN RELOADED! With this remarkable app, you can unlock the full potential of the internet while ensuring your online activities remain secure and private. Stay tuned to our channel for more exciting tech-related content and tips.
For a more additional updates, make sure to follow me on various platforms:
📺 Watch my previously deleted YouTube video on my Rumble Channel:
💬 Join my Telegram Group for discussions and updates:
📢 Stay updated with my Telegram channel:
🔖 Follow my blog for more tech insights and tutorials:
📱 Connect with me on WhatsApp:
📘 Like and follow my Facebook page:
🎥 Subscribe to my YouTube channels:
- 13 Tech: https://youtube.com/@13tech
- 12_5 Tech: https://youtube.com/@12_5tech
- 13_3 Tech: https://youtube.com/@13_3tech
-
🙏 Thank you for Reading the blog post, and don't forget to Follow and share Blog Post to support my blog for more such content. Get ready to embark on an incredible journey with STARK VPN RELOADED!


![Creating a fast and secure PSIPHON server and setting up HTTP CUSTOM VPN [ Updated]](https://blogger.googleusercontent.com/img/b/R29vZ2xl/AVvXsEi1F0y6bWti6-49ug3ugA771FCnsXsxeqwdW2Gv70pqNC8dRBzbRh7Ndd27oaU-ECo1Xnbqwf9qwJeylcy4-sqsXWFySf7NGv5sFGbUjFxJ0nHu9JCz-wbh7S6ogFf9xf62la2uWkfeSHg/w72-h72-p-k-no-nu/1689430725344148-0.png)


0 Comments