Introduction:
Welcome to our tutorial on creating a fast and secure PSIPHON server and setting up HTTP CUSTOM VPN to enhance your browsing experience. If you're new here, make sure to watch our previous video on creating a PSIPHON server, as we'll be building upon that knowledge. Today, we'll walk you through the step-by-step process, ensuring you can browse the web with speed and security.
Section 1: Creating a PSIPHON Server
In this section, I will guide you through the process of creating a fast and secure PSIPHON server.
Step 1: Use any browser and visit the OpenVPN SSH website.
Step 2: On the homepage, click on the "USER" label to proceed.
Step 3: From the list of options, choose and click on "PSIPHON."
Step 4: Now, it's time to choose a location for your PSIPHON server. Click on "CREATE USER."
Step 5: Click on the "GENERATE" label button to create the server for your chosen location.
Step 6: Copy the server details, especially the HAX KEY, and save it on a notepad for setting up HTTP CUSTOM VPN.
Section 2: Setting Up HTTP CUSTOM VPN for PSIPHON Server
In this section, I will guide you on how to set up HTTP CUSTOM VPN for your PSIPHON server.
Step 1: Download and install HTTP CUSTOM VPN from your mobile app store.
Step 2: After installing, launch the app, and you will see its home screen.
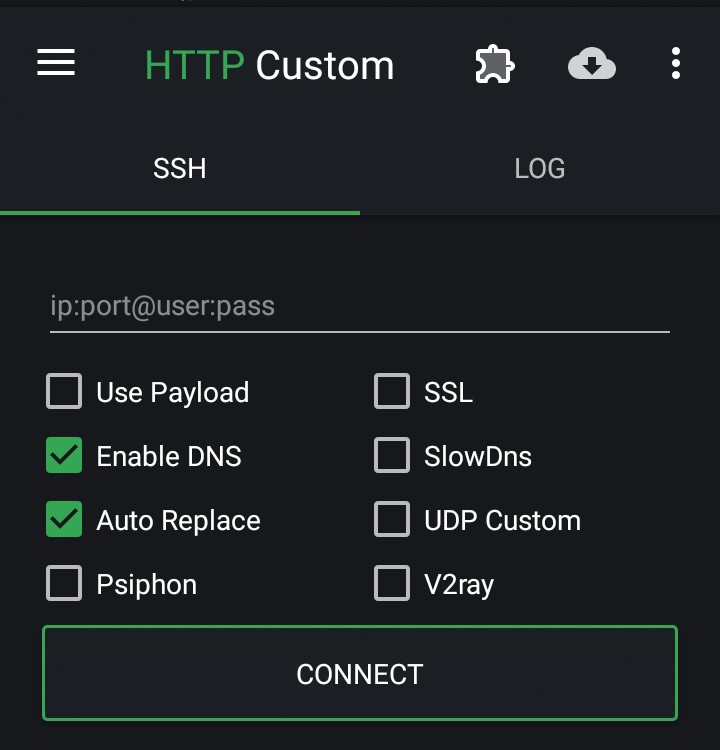
Step 3: Check the "PSIPHON" box to configure its settings and use it.
Step 4: Click on the plugin icon to expand more settings.
Step 5: Select "PSIPHON SETTINGS" from the list of options to configure the PSIPHON settings.
Step 6: In the PSIPHON settings, paste the HAX KEY of the server you created into the server box as shown.
Step 7: After setting up the server, choose any given protocol from the list of protocols and then return back to the home screen.
Step 8: All done! Tap on the "CONNECT" button to start the VPN.
Step 9: If you want to use a payload and proxy, check the "PAYLOAD" box as shown.
Step 10: Click on the hamburger icon on the top-left corner of the app.
Step 11: From the "UTILITY" section, click on "PAYLOAD" to configure payload settings.
Step 12: To set up the payload and proxy, use the provided or custom payload as shown. For the proxy, use the PSIPHON server host as the proxy, or any other if you have one.
Step 13: Now go back to the home screen and tap on the "CONNECT" button to use the VPN.
Congratulations! You've successfully set up your PSIPHON server and configured HTTP CUSTOM VPN. Now you can browse the internet with confidence, knowing your data is secure and your connection is optimized for speed. If you found this tutorial helpful, don't forget to give it a thumbs up and subscribe to our channel for more tech guides and helpful tips. For additional information and updates, visit our blog linked in the description below. Thank you for watching, and happy browsing!


0 Comments